I was busy with family things in February so I missed wishing everyone a Happy Valentines Day.
Shamefully, although I didn't send wishes to others, some dear folks sent me gifts of cards and chocolates and a variety of delightful surprises. I can't even describe how much those gestures lifted my spirits in a time when I was feeling a bit overwhelmed.One far away friend sent me this cute donut pan and a pre-made donut mix, just add an egg and some melted butter, then bake.
At first I thought, well, that's funny, because I never make donuts.
But I soon realized that I was wrong... because I do make donuts! (At least I do now!)
The mix was a perfect introduction to making donuts. It was so quick and easy. Within minutes it produced a plate of warm delicious apple-cinnamon baked cake donuts. And when I ate them I realized that baked cake donuts were exactly what I needed at that moment.
Then, a few days later I wanted more. So I used the recipe that came with the donut pan:It is a simple recipe.Whisk the dry ingredients together. (I used my heart bowl since I was making these for Belated Valentines Day.)Mix the wet ingredients in a separate bowl.Combine the wet ingredients with the dry ingredients and beat well. (The mixture is quite thick.)I spooned it into a plastic bag and cut a hole in one corner of the bag so I could pipe it into the heart shapes of the donut pan.But first I brushed the hearts with melted butter.Bake at 400° for 4-5 minutes.I squeezed a couple of drops of red food color into some sugar and stirred it around to make the donuts pretty in pink.When they came out of the oven I brushed them with a little bit more melted butter and then I dipped them in the pink sugar. (Then I realized it worked better to just sprinkle the sugar over them.)
I loved the taste of these, especially the touch of nutmeg, but the texture was not quite as light and cakey as the donuts made from the mix.But they were so easy and so delightful I had to share them with you anyway. Maybe the recipe just needs a tiny bit of tweaking... hmmm, what a good excuse to make some more donuts!
Hollandaise sauce sounds fancy. And difficult. And time consuming. And fussy.But it's totally not any of those things!
It's fun. It's simple. It's quick. And it's forgiving.
Really! Just do it my way...
Melt some butter.
Whisk an egg yolk, lemon juice, water, and some spices together in a bowl over simmering water for a few minutes.Remove that bowl from the heat and whisk in the butter.
Done!
Amazingly, this Hollandaise Sauce can even sit around waiting for you to use it for a little while.
Unfortunately, I can't tell you how long it can sit around...
Folks, in the interest of food science, in the interest of this blog, and in order to serve you... you, dear readers... I tried to see how long this Hollandaise Sauce could sit around, waiting to be used.
But I kept sticking my fingers in it.
I tried to see how long it would take for this sauce to separate... but I could not do it. I shamelessly stuck my finger in the bowl and licked it every time I passed by that bowl. Eventually the sauce was completely gone.
I can only tell you that the sauce stayed deliciously smooth and saucy for one hour and twenty three minutes... because that's how long it took me to lick the bowl completely clean.
It reminded me of that old Tootsie Roll commercial... remember that one? How many licks does it take to get to the tootsie roll center of a Tootsie Pop? Try this Hollandaise Sauce... I know you'll like it!HOMEGROWN COUNTRYGIRL HOLLANDAISE SAUCE
1 egg yolk 1 teaspoon lemon juice 1 teaspoon water a pinch of a hot spice, like cayenne pepper, or chipolte powder or "hot" spice a pinch of salt (if you're using unsalted butter) 4 tablespoons butter, melted
Use a double boiler or place a bowl over a pan of simmering water. Put yolk, lemon juice, and water in bowl. Whisk. Keep whisking over simmering water for 2-3 minutes, until mixture begins to get lighter and thicken slightly. This part, whisking and simmering for a few minutes until it gets lighter and thickens a bit, seems to be an important step in the stability of the sauce... whisk until dribbling sauce leaves a bit of a ribbony mark on top of the rest of the sauce. (This is like "trace" to any of you soapmakers out there.) At this time remove bowl from the double boiler water. Gradually whisk in melted butter, just a few drops at a time, similar to making mayonnaise. When mixture begins to emulsify you can whisk in the rest of the melted butter. Double or triple recipe as needed.
If sauce sits for a while before you use it the sauce may thicken to a less pourable consistency. If this happens, just whisk in a teaspoon or so of warm water... it makes the sauce pourable without changing the taste or consistency of the sauce.
Something I like about keeping a garden is that I get to anticipate different foods at different times of the year. Each season brings a variety of different foods... and I enjoy looking forward to harvesting the new foods of each season.
A couple of weeks ago I started gently scratching around in the asparagus bed. I knew that soon I would start seeing some thick nubby stubs of asparagus peeking out of the ground... and eventually, one day last week, I did!
Asparagus grows quickly this time of year and I've been eating asparagus every day ever since I noticed that first stalk! Add a handful of spinach that I planted a while back, some fresh eggs, and a few chives, and I have the makings for one of my favorite go-to meals this time of year... a delicious spring omelet!I briefly saute some spinach and asparagus and then set it aside.Then I whisk up a couple of eggs with a bit of salt and pepper. I pour the eggs into the already heated pan and nudge the edges of the egg inward, tipping the pan to spread the uncooked egg to the new edge.
Then I put the spinach and asparagus on one side, add some shredded cheese, fold it over, and sprinkle some fresh cut chives on top.Classy! No wonder I look forward to spring so much!
But apparently Mother Nature doesn't read my blog, because she's kept everything under a deep freeze here for a long time now. Other than one little teasingly nice day, the temperatures here have remained 20 degrees below normal. The ground is still too frozen to plant potatoes, which means that I might not have potatoes in June.
Not being able to plant potatoes, of course, has me thinking about potatoes. So I'm posting this lovely potato salad recipe... I hope you like it... Making a potato salad always seems like a lot of work, doesn't it? You have to peel potatoes. And cook potatoes. And chop potatoes. And boil eggs. And peel eggs. And chop eggs. And chop up more vegetables. And mix up a batch of dressing. By the time you're done preparing it every bowl, whisk, mixing spoon, and cutting tool that you own is soiled and the kitchen looks like a tornado came through. Sometimes I even have to change my clothes. I'll be honest. This potato salad is no different. There's a lot of prep to this one, too. But it has a fairly short ingredient list. And the dressing is a cinch. It's exactly what you are looking for if you're looking for something new to try. It's a simple twist of an old favorite. This potato salad will be a hit every time... I promise.
SUPER SIMPLE & SUPRISINGLY SCRUMPTIOUS SPUD SALAD 2 pounds potatoes, boiled until fork tender, cooled, then roughly chopped* 6 hard boiled eggs, finely choppped 1 pound bacon, chopped, cooked in skillet, and drained 1/2 cup finely chopped onion (I like a red onion best in this) 1/2 cup finely chopped celery 1 cup mayonnaise (store bought, or make your own) 1 cup sour cream salt and pepper, to taste
Toss potatoes, eggs, bacon, onion, and celery together in a large bowl. Stir Mayonnaise and sour cream together in a smaller bowl. (I add some salt and pepper to this mixture). Stir half of the dressing into the ingredients in the large bowl. Cover remaining dressing and reserve. Just before serving stir in remaining dressing. Taste and adjust seasonings.
*I grow 2 all purpose potato varieties, white kennebec and red pontiac, so those are the varieties that I use for all potato recipes. (Both of these varieties also happen to store very well.)
News from Japan is horrifying. Images of destruction flash across my television. Every day the death toll rises. It seems everyone in the world is holding their breath as nuclear facilities leak, financial markets react, and aftershocks continue. Many people are still missing. I can not even imagine the horror of not being able to find a loved one. I have been praying for everyone.And I've been making noodles.
For some reason I find comfort in making noodles.I find comfort in eating noodles, too... but today let's just talk about making them.
By the way, there are a number of delicious and unique Japanese style noodles... ramen, shirataki, udon, and soba, to name just a few. I like all those noodles! But I don't know how to make any of them. I only know how to make countrygirl noodles. I'm not a talented noodle maker... but that's one of the glorious things about noodles... you don't have to have any special sills to make really good ones!
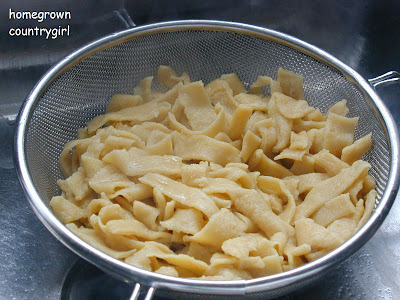
Start with eggs, flour, and salt. I usually start with two eggs and a heaping cup of flour. Dump flour out on a clean counter top, sprinkle with a pinch of salt and then use your fingers to make a well in the hill of flour. Drop eggs into the well. Ooops. Sometimes this happens. Like I said, you don't have to have any special talent to make tasty noodles. No one ever even has to know this happened (unless you post a picture of it on the world wide web).
Use a fork to gradually whisk flour into eggs.The mixture will become too thick to mix with a fork. Start using your hands to knead the flour in. You may need to sprinkle more flour onto your counter top.Keep kneading and adding flour until the mixture is easy to handle and not sticky.Then wrap it in a piece of plastic wrap and set it aside for at least an hour, maybe a few hours. Letting it rest seems to make it easier to roll out later.After it has rested use rolling pin to roll noodle dough as thin as possible.
Some people roll the dough up into a tube and cut long strips off. I don't do it like that. I use this broken old spatula like a dough scraper to cut the dough into strips... Then I use it to cut the strips into noodle sized pieces.I do this on a parchment lined baking sheet.Cook noodles right away or leave them on the parchment to dry. I store dried noodles in a sealed container in the refrigerator, and I usually use them within a few days.Maybe you, too, will find comfort in noodles.
A series of downpours has waterlogged quite a few folks.
Fields are flooded. Roads have been closed due to high water. Animals slop around in muddy pastures. And everything is covered in mud.
Just doing everyday chores is a mess. My shoes sink into the ground and get caked with heavy clods of wet mud. Clumps of mud splash up on my pants and my coat. And dogs track it into the house.
I see mud everywhere. Even in my dreams.
And on my plate.
Yes, I have seen so much mud that I just couldn't help myself, I just had to make a mud pie!I made a graham cracker crust for this pie. It was tasty. And really super easy.
This rich tasting pie would definitely be nice with a pastry crust (my pie crust recipe can be found here). But this graham cracker crust was a snap to make. And making it only dirtied one dish (the little pan I used to melt the butter). Having only one dish to wash seemed like a pretty big deal to me after cleaning up ten million muddy dog footprints. A pretty pie crust and just one little dirty dish? Yes, please!
This pie is a rich mocha filling poured over crunchy toasted walnuts that bakes into a delicious brownie like goodness. I used mostly English walnuts, adding just a few black walnuts. To be completely honest, I was just too lazy to shell out a whole cup of black walnuts. Luckily, I think my laziness turned out to be a good thing. Adding a few black walnuts added a nice earthiness to the flavor of the pie, but I think using only black walnuts would have been too strong, and may have drowned out how well the chocolate and coffee blended together.
Speaking of chocolate and coffee... I ate a piece of this pie with my coffee this morning... ohmygosh!!!MUDDY DAY PIE
For the crust: 9 graham crackers 2 tablespoons sugar 6 tablespoons melted butter
For the pie: 1 cup chopped walnuts (toast them first for a few minutes on the stove to really bring out their flavor) 1 cup semi-sweet chocolate chips 1/2 cup butter 1/4 cup corn syrup (light or dark) 2 tablespoons instant coffee 2 tablespoons coffee liqueur 3 eggs
Melt 6 tablespoons of butter and then let butter cool to slightly warm. Place graham crackers in a resealable plastic bag and use rolling pin to crush crackers into crumbs. Add sugar. Shake bag to blend sugar and crumbs. Then pour melted (and slightly cooled) butter into bag and squeeze bag all over to blend all ingredients. Pour crumb mixture into a 9 inch deep dish pie plate. Press crumbs to bottom and sides of pie plate to form crust. Spread 1 cup of chopped walnuts over crust. Set aside.
Gently heat 1 cup chocolate chips, 1/2 cup butter, and 1/4 cup corn syrup. Stir together well and set aside until slightly cool. When cooled to just warm, add 2 tablespoons of instant coffee, 2 tablespoons of coffee liqueur and 3 eggs. Beat well. Pour over walnuts in graham cracker crust.
Cook for 45 minutes in 350 degree oven. Let cool completely before slicing.
Here they are more recently...And if you don't believe me that they are monsters, take a look at this...See what I mean?
But sometimes they can be good, like here...And here... And even here...But these guys are here on this blog today to promote a very important holiday... International Dog Biscuit Appreciation Day.
Actually, to be totally honest, around here every day is Dog Biscuit Appreciation Day. Because dog biscuits help us to be good. Dog biscuits help us to get from here to there. They help us to do fabulous entertaining tricks. And they help us to lay down and be good.
Sometimes.
Well, okay, occasionally... enough that it's worth celebrating dog biscuits (we call them "cookies" around here).
We've made dog cookies on this blog before. But we can't let International Dog Biscuit Appreciation Day go by without some major celebration... so let's make some more!
Personally, I think it's kind of lame to post a "homegrown" recipe that only has one little homegrown ingredient in it, (an egg), but the monsters encouraged me that it was the right thing to do... so here's the recipe:
PEANUT BUTTER DOG COOKIES
3 cups all purpose flour 1 tablespoon baking powder 1 teaspoon baking soda 1 teaspoon cinnamon 1/2 cup vegetable oil 1/2 cup water 1/4 cup peanut butter 1 egg
Preheat oven to 325 degrees. Combine flour, baking powder, baking soda, and cinnamon together in a bowl and blend with a wire whisk. Combine vegetable oil, water, and peanut butter in another bowl. Whisk that together. Add egg and whisk again. Pour wet ingredients into dry ingredients and stir to combine as much as possible, then knead the dough by hand to incorporate all the dry ingredients into the dough. Turn bowl out onto a floured surface and press out to about 1/2 inch thick. Cut into pieces the appropriate size for your monsters. Place on cookie sheet. Bake about 30 minutes. After 30 minutes turn the oven off but leave cookies in oven for several hours or overnight before removing. Happiness is a full jar of dog cookies.
While the whole rest of the food blogging world is posting romantic Valentine's Day recipes and menus to woo your lover, I'm going to do something different. I'm going to blog about something I love... something I'm passionate about... Cornbread!
Hey, I'm not the only one! I've noticed that others are passionate about cornbread, too.People are serious about their cornbread! Need an example? Give a Southerner a piece of sweet cornbread made with sugar and see what happens. Or give a Yankee a piece of crumbly cornbread made with only cornmeal and no flour and ask what they think of it. Chances are you'll strike out in both cases.
So. Here's my favorite cornbread. This my recipe, and how I like it.
Maybe you'll like it, too...
I make this recipe in my #6 cast iron skillet which measures 9 inches across the top. And I use cornmeal that I grind from homegrown field corn... I'll show you that process... someday.
For now, let's just talk about the cornbread!
First, put some lard or bacon grease in an iron skillet and place skillet in oven. Turn oven on and start preheating to 450 degrees.While lard is melting, whisk together some cornmeal, flour, salt, and baking soda.In another bowl, measure out some buttermilk and add a couple of eggs. Whisk this mixture together, too..Your lard should be melted by now. Carefully remove that skillet from the oven and pour all but about 1 tablespoon of the lard into a small cup. Place skillet (with remaining tablespoon of lard in it) back into the oven.
Let the removed lard in the small cup cool slightly. Then add it to your buttermilk and eggs and whisk againPour buttermilk mixture into dry mixture, blend together with whisk (mixture will loose enough to stir with a wire whisk).
Remove hot skillet from oven again and pour batter into skillet. It will sizzle as you pour it in.Return to oven and bake until done... it won't take long, only about 12-15 minutes.
Here's a piece I slathered with butter and honey... it just seemed like a good idea (and it was)...HOMEGROWN COUNTRYGIRL'S #6 SKILLET CORNBREAD
4 tablespoons lard (or bacon grease) 1 cup cornmeal 1/2 cup flour 1/2 teaspoon salt 1 teaspoon baking soda 1 cup buttermilk 2 eggs
Place 4 tablespoons lard in 9 inch iron skillet and place skillet in oven. Turn oven on to 450 degrees. Combine cornmeal, flour, salt, and baking soda in a bowl and whisk together to blend. In another bowl combine 1 cup buttermilk and 2 eggs. Whisk together. Remove skillet from oven and pour 3 tablespoons of lard into a small cup. Leave remaining 1 tablespoon lard in skillet and return skillet to oven. When lard in cup has cooled enough to add it to the buttermilk mixture, add it to the mixture and whisk again to combine. Pour buttermilk mixture into cornmeal mixture, whisking with wire whisk to blend. Remove skillet from oven. Pour mixture into skillet. It will sizzle when you pour it in. Return skillet to oven and bake for 12-15 minutes, until golden on top and a toothpick inserted in center comes out clean.
Welcome to my little corner of the world! I like to eat home grown food so this blog is mostly about doing that.
Summer 2012 update: I'm putting up fewer posts for a few months as I'm learning to juggle some new responsibilities in my life. I hope to get back to more frequent posting soon. Thank you for visiting! love, homegrown countrygirl
homegrowncountrygirlfood (at) gmail (dot com)