Showing posts with label grains. Show all posts

September 16, 2010

Winter Rye


Like winter wheat, winter rye is planted in late autumn. It thrives on fall's bright sunny days and cool damp nights, growing remarkably fast for it's first few weeks of life. Then, just as those young fragile looking wisps of green begin to turn into a lush green carpet, the weather turns harsh and winter arrives. Cold weather seems to choke out the new growth, turning it yellow and brown. You think it can't survive. Later in winter the snow and ice cover it brutally. And you forget all about it.

But those winter grains have remarkable survival skills. A field of wheat or rye can withstand even the toughest winter.

In the spring, melting snow will reveal dull looking patches of green. You may remember that the rye was there. But it looks bad. You wonder if it will make it. You think about how you trampled over it pulling a downed tree to chop for use in the wood stove over the winter. You remember how the monsters rough-housed on it after a brief thaw and how they tore deep gashes into the muddy ground. It couldn't have survived that, could it?

Don't worry. Rye is resilient. By the time nature gives us just one sunny day, a promise that spring will come, that rye turns into the prettiest green that you've ever seen. A field of wheat or rye in the early spring is the brightest, most colorful thing for miles.

We are all familiar with the sweet, nutty taste of rye, or pumpernickel bread, but rye might be grown for a variety of other uses, as well. The grain may also be eaten as cereal. Mixed with other forage it may be grazed upon by livestock in a pasture. Rye straw is preferred by some for animal bedding in stalls. And, of course, it can be made into whiskey!Rye might be grown by home gardeners for another purpose... to keep the topsoil in the garden! Each year, water, snow, and ice wash unplanted loose soil out of gardens. Planting a cover crop will help to keep the soil there. When you're ready to plant your garden just mow over the rye and till it in. Not only will it have helped to retain your soil but few weeds will grow in rye, so you will have relatively few weed seeds to fight.

But when you cut it and till it under you'll miss out on the fantasitc beauty of those tall golden stalks and silk encased grain tops. A field of rye is just magnificent.

May 2, 2010

Tortillas

Flour, grease, salt, and water are all you need to make these soft, chewy, easy tortillas.

Spend a few minutes to mix your ingredients and form the dough into balls. Cover with a damp cloth and let them sit for several hours or overnight. After they have rested roll them out and cook them, one at a time, on a dry iron skillet.

Now comes the hard part. You have to ignore everything you've ever learned about putting something warm into a plastic bag. If you are not using them right away, put them into a plastic bag while they are still warm. They will stay soft for a few days if you do this.

TORTILLAS

Whisk together 2 1/2 cups flour and 1/2 teaspoon salt.

Cut in 1/4 cup bacon grease until mixture looks like coarse crumbs.

Pour in 3/4 cup boiling water and mix together. Form into 1 1/2" diameter balls. This recipe makes 8-10 tortillas that easily fit in a 9" or 10" iron skillet.

Place the formed balls of dough on a plate, cover with a damp cloth, and let sit at room temperature for 2-8 hours. The longer these rest the easier they are to roll out and they make softer tortillas.

When ready to cook, roll them out to 1/8" thickness on a lightly floured surface and cook, one at a time, on a hot dry iron skillet. Cook each side for just a minute or less. Let them get a few warm brown spots. They puff up while cooking and then flatten again when removed. Let each tortilla cool briefly, but put it into a plastic bag while it is still slightly warm. The tortillas can be placed right on top of each other in the same resealable plastic bag.

When the bag has cooled to room temperature place it in the refrigerator until ready to use.

To make whole wheat tortillas replace a portion of the all purpose white flour with wheat. Wheat tortillas have a nice nutty wheat taste but they do not keep well like tortillas made with 100% all purpose flour.

August 31, 2009

Monster Cookies

Meet the Monsters.
Normally quite monstrous, they will do anything for one of these tasty cookies.

If you make these cookies you can get your own Monsters to do anything you want, too.Here's what you do:

Preheat oven to 325 degrees.

Whisk together the following dry ingredients and then set them aside:

2 cups all purpose flour
1 cup whole wheat flour
1 tablespoon baking powder
1 teaspoon baking soda
1 pinch cinnamon or dried parsley (optional)

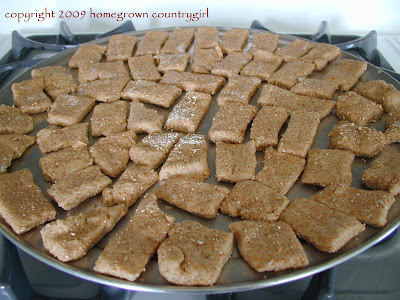
Melt 1/3 to 1/2 cup of lard, grease, or shortening. I like to use bacon grease for these.

Add lukewarm water to grease to make it all equal 1 full cup.

Pour into a small bowl. Let grease and water cool enough to add an egg. Then whisk in 1 egg.

Pour wet ingredients into dry ingredients and stir.

Roll or press out to about 1/4 inch thickness on a floured surface.

Cut into big or small pieces, depending on the size of your monster.

Place on an ungreased baking sheet. (These can be placed close together and then broken apart easily later if they connect while baking.)

Bake for 30 minutes.

Turn oven off and leave cookies in oven overnight.

These cookies will keep for several weeks in an airtight container. (But they won't last that long.)

I know that these are tasty enough. I'll tell you a secret... I've tried them myself.

One time I even fed one to my brother in law. (Shhhh. Don't tell!)

July 20, 2009

Harvesting Gold

New wheat has been harvested!
Back in early March these little shoots of winter wheat (and one lonely robin sitting at the tippy top of a naked tree branch) announced that spring was right around the corner.
By May the wheat made the field look like a sea of green.
One day in June the tips of the wheat started to yellow. The color change was so discreet I almost didn't see it happen.
And now that it's July this combine harvests those tiny little wheat berries from their golden stems.
Nothing goes to waste. The piles of cut stalks get baled up into nice dry straw that has billions of uses.
The planter follows directly behind the baler to plant beans that will amend the soil.
And the wheat is hauled to the elevator where it is turned into real gold.

June 21, 2009

Mulberry In Your Eye Pie

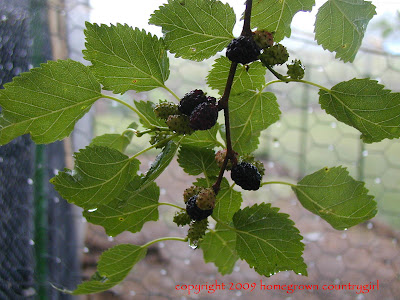
Mulberries are low in calories and are a good source of Vitamin C. They also have a little bit of protein and fiber. And they are sweet and tasty.

Mulberries are also a major cause of purple bird poop. So if there is a mulberry tree growing nearby you probably know about it. But let's try to stick to one of it's better points for now... mulberries make a terrific pie!

A good way to gather your mulberries is to lay tarps down under the tree and then shake, jiggle, rustle, or hang on the branches so that the ripe berries fall onto your tarps.

Another way is to pick the berries individually, standing under (or climbing in) your tree. If you do it this way you may want to wear goggles because something will always get into an eye. I know this for a fact.

I'm just sayin'. This recipe didn't acquire it's name without merit.

Mulberry in Your Eye Pie
3 cups fresh mulberries
1 1/4 cups sugar
1/2 cup flour
1 tablespoon cold butter
pie crust for 2 crust pie (recipe for a homegrown whole wheat one here)

Gently rinse mulberries in a colander and shake most of the water off. Remove stems if desired. (I don't.) In a large bowl whisk sugar and flour together. Add mulberries and stir lightly. Place bottom pie crust in a regular (not deep dish) pie pan. Pour berries in. Pinch off pieces of butter and dot berries with it. Cover with top crust. Poke holes in top crust with a fork and finish off edges as desired. Let unbaked pie rest in fridge for about 30 minutes before baking. Preheat oven to 400 degrees. Bake pie for 15 minutes at 400 degrees. After 15 minutes reduce heat to 350 degrees and bake for another 30-40 minutes. Let pie cool to room temperature before serving.

June 13, 2009

Storing Whole Wheat and Making Something Sweet (Pie Crust)!

Okay. So I'm starting this blog "growing and eating much of our own food..." with a big lie. Because we didn't grow this wheat. Our neighbor did.

But I might as well start out with imperfection here... because if anyone ever actually reads any of this babble (Hi, Mom!) they will easily see my shortcomings. So I'm not even going to try to hide them.

Besides, this wheat was 'almost' home grown, as I watched it's daily progress, from a field of tender little green shoots in neat, straight rows, to a beautiful golden sea of graceful summer waves. I thought about it in the winter as it lay below a cold blanket of snow. I watched for it to perk up in the spring. I prayed for rain when it was thirsty. And I rejoiced at harvest time even as the cloud of wheat husks veiled everything in dust.

I like to watch food grow.

Dry wheat berries will keep almost indefinitely in an airtight container. I use food grade 5 gallon buckets with a tight fitting lid. These wheat berries came straight out of the combine. I placed the whole sealed container in the freezer for a number of days, thawed it out for a couple of weeks, and then froze it again for a while to destroy any possible insects or insect eggs. Now it is stays in the pantry and I grind it as needed.

There are a number of different ways to grind wheat. One of the quickest and easiest ways is to grind it in your blender. It only takes a few seconds to do it that way. I usually use the blender because it's so convenient.

Freshly ground whole wheat makes a flaky pie crust and I think it adds a nice mellow flavor to the pie. But I might be biased because, well, we're talking PIE here. What's not to like?

Everyone has their favorite recipe for pie crust. Here's mine. It's easy!

WHITE OR WHOLE WHEAT PIE CRUST

(Recipe makes enough for a top and a bottom crust)

2 cups all purpose flour (or 1 cup all purpose and 1 cup whole wheat)

1/2 teaspoon salt

2 teaspoons sugar

1/3 cup + 1 Tablespoon cold butter

1/3 cup + 1 Tablespoon cold lard

4-6 Tablespoons ice cold water

Whisk together the flour, salt, and sugar. Cut up cold butter and cold lard into the bowl and place bowl in freezer for a few minutes.

Make a small glass if ice water and place it in the freezer.

Remove bowl of flour from freezer and use two forks or pastry cutter to break up butter and lard into pea sized bits.

Add 4-6 Tablespoons of ice water, as needed, from the cold cup of ice water and mix together just until dough is wet enough to be rolled out.

Divide dough into 2 equal portions.

Roll out each portion separately on a lightly floured surface. It's alright if there are a few cracks or breaks along the edges. They can usually be mended with a bit of leftover crust later without any one even noticing.

Place in pie plate, cut to fit, (mend any cracks) and bake as directed for the pie you are making.

If I am making a one crust pie I don't roll out the unused portion. I wrap it in plastic wrap, label it, and put it in the freezer. Pie crust freezes well and can be thawed and rolled out for your next pie with good results.